Portrait Workshop Success, Landscape Workshop Scheduled July 26

We had a great session today in our Portrait Photography and Photoshop Retouching class. Great turnout in spite of 108 degree temps outdoors!

Next week, July 26 we have another workshop on landscape photography and image editing in Photoshop.

_MEL1851 copym

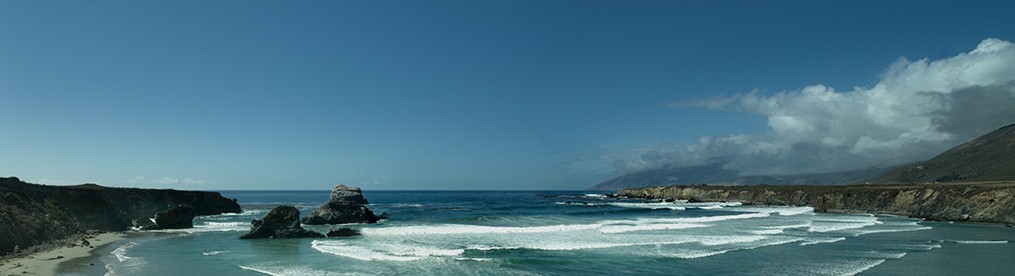
Workshop Session Two, Photoshop Techniques, Editing Landscape and Scenic Imagery

July 26, ‘09, 9 am-5 pm. Session fee $79 before applicable discount. SCVPA and NAPP members are eligible for discount.

Laptops encouraged. Students are also encouraged to bring their own images to work on.

Topics Include:

  1. Panorama techniques that WORK!
  2. Tips and Tricks in Camera RAW – get that image ready for prime time!
  3. Matching color in multiple images
  4. Full- Frame Color – fast track to whole-image color control
  5. Selective Color – adjusting selected colors to make an image “pop”
  6. Lighting – adjusting luminance of the entire image, or selected areas
  7. Creating that cool 3D look- dimensionality and depth with two key Photoshop tools
  8. Recovering highlight detail, restoring shadow detail – two techniques for success
  9. Poor man’s HDR – combining exposures for extra bounce
  10. Create front to back depth of field and sharpness – landscapes and close-up shots
  11. Intelligent Sharpening – crisp details, no halos!
  12. Converting to Black and White – using color adjustments and filters
  13. Choosing print media for appearance, longevity, marketability
  14. Providing a Professional Certificate of Authenticity with each print sold

Location: SCV Center for Photography, Santa Clarita, Calif.
28368 Constellation Road, Suite 340, Santa Clarita 91355

Go here for details and registration link: http://tinyurl.com/pfk6kw


my web site: www.davidsaffir.com

New Fine Art Printmaking and Art Reproduction Tour

FINE ART PRINTMAKING & ART REPRODUCTION SEMINARS, DAVID SAFFIR, OTHER INSTRUCTORS

7 CITY TOUR IN OCTOBER 2009, APPROX DATES OCT 1-15

This will include:

  • studio setup
  • lighting
  • digital capture
  • capture and digital asset management
  • image editing
  • color management
  • printing
  • print finishing

…..and more!

 Call for details and registration,  303-934-2777 or go http://tinyurl.com/nbupma

ALBUQUERQUE, SANTA FE, PHOENIX,  TUCSON, 
SEDONA, DENVER, GLENWOOD SPRINGS

New Article – Success Story, Fine Art Reproduction

New featured article on the HP Graphics web portal: “Photographer launches reproduction business, using HP Designjet Z3200 Photo Printer and HP Artist Solution for Nikon”

Here is the link.

Newsletter, July 2009

Just back from some consulting gigs in the Southwest. What a summer!

In this issue:

New how-to articles, new Photoshop classes in California, upcoming seminars and workshops in San Diego, New Mexico, Arizona, Colorado, Chicago, and New York.

NEW ARTICLES:

Quick Portrait Retouch in Photoshop, Part I

Managing and Archiving Your Photos, Part II, guest author Robert Ash

Getting It Right In The Camera, Part I: Managing Depth of Field, guest author Ted Dayton

NEW Photoshop Classes

Turbo Portrait Retouch, Landscape Images, Personal Book Publishing

This multi-session series will enable photographers and other artists to use Adobe image editing products effectively and efficiently. I use a goal-oriented, hands-on approach.

Sessions are divided into segments that focus on important, practical issues. You can attend one, or all. You’you’ll go home and get results!

•Session 1, Photoshop: Turbo Portrait Retouching, 7/19

•Session 2, Photoshop, Landscape & Scenic Imagery, 7/26

•Session 3, Design and Create A Photo Book, 8/16

Click for details and registration.

Santa Fe Workshops: Digital Intensive: Fine Art Reproduction, Nov 2009

This three-day hands-on intensive is for photographers, artists, printmakers, curators, and gallery owners or managers interested in making fine- art reproductions for themselves or providing this service for others. Covering both the technical and the business aspects of fine-art reproduction, participants work through all the essential steps in the digital reproduction of works of art, from handling and capturing artwork to managing the artist’s expectations and profitability. Click here to see more and register


NEW WORKSHOP SERIES: The Art and Business of Fine Art Reproduction

New Mexico, Colorado, Arizona, October 2009

Join us for a day-long intensive seminar on techniques for capturing, editing, printing, and finishing fine art reproduction, plus a detailed review of managing limited editions and making this into a sustainable business. Geared toward photographers, galleries, artists, interior designers, framers, and more. Cities will include Phoenix, Denver, Albuquerque/Santa Fe, and others. Exact dates and locations TBA; stay tuned for details! If you want to be placed on the update list, email me: davidsaffir(at)mac.com (insert @ sign, please).

New photo tour: Fall Into New England (FINE), taught by April Bielefeld, Friday Oct 9- Saturday Oct 17

Here’s some info on April’s annual New England Photo Workshop: “October is not complete without our annual guided photo trip to New England. Autumn in New Hampshire, Vermont and Maine is a feast for the eyes and the senses. The brilliant reds, the early morning frost on the leaves, bright yellow school buses filled with children….” (click on link above to read more)

News at deadline:

I will also be presenting and teaching at Print 09 Sept 11-16, in Chicago, and PPE Oct 22-24 in New York.

Techno Reviews: Watch my blog in August for a review of the Mamiya AFD III and their new 56-mp digital back!

New Series: Getting It Right In the Camera – Managing Depth of Field

We have a new guest author joining us. Ted Dayton (teddaytonphotography.com) has decades of experience as a commercial photographer, shooting celebrities, fashion, stock, product, architectural, and others with great success.

 He is one of the best photographers I know, producing work that is distinctive and meticulously crafted. He is also President of the Santa Clarita Photographer’s Association, and a graduate of Brooks Institute of Santa Barbara.

 In this article, Ted discusses Depth of Field, one of the key issues surrounding the topic of “Getting It Right In the Camera”.

__________________________________________________________________________________________  

Popular Myths About Camera Lenses and Depth of Field

There is a myth that wide-angle lenses provide more depth of field than long lenses.

I would like to set things straight, as some readers may still be believers. We tend to use wide lenses and long lenses very differently and our perception of their relative Depth of Field properties is affected accordingly.

Wide lenses seem to have more Depth of Field because we tend to use them in ways that do in fact provide a lot of depth of field. We tend to back away from our subjects so we can see a wide view of things. This distance-to-subject dynamic affects Depth of Field as much as aperture setting does.

The lens is focused closer to infinity than for close-ups, and all lenses and all aperture settings provide greater Depth of Field as the plane of focus approaches infinity. We also tend to stop down when using short lenses in order to include as much information (sharpness) as possible in support of our wide view of things. So, we think of wide lenses as providing the greatest amount of Depth of Field.

With long lenses, we tend to shoot closer to a wide-open aperture for many reasons. Stopping down requires longer shutter speeds, which lead to shaky pictures if taken hand-held. Long lenses are harder to hold still and faster shutter speeds that are accessible when shooting closer to wide-open solve the problem.

And, long lenses are great for isolating distant subjects from other elements, especially if we use them, ahem, wide open. And so we think of long lenses as producing less Depth of Field than shorter lenses because most long lens photos we take do have shallow Depth of Field.

But it isn’t so!

Try this exercise on your own: put some common object like a basketball on the table in the backyard and take pictures of it with lenses of all focal lengths. Shoot all of these pictures at the very same aperture and fill the frame the same amount with the ball in every single frame.

Look closely when you edit and you will see the same amount of Depth of Field in every frame regardless of focal length, because of two things: the aperture setting didn’t change and the size of the ball in the frame didn’t change. This test is easier to understand if you use a fairly large aperture, like f/4. If you focus on the nearest part of the ball with a 28mm or a 200mm, the rest of the ball behind the plane of focus will be equally out of focus no matter which lens you use! (note: we did not provide an image example because we feel it is important for readers to perform this exercise and see this for themselves – David)

Summary

Depth of Field is a function of aperture setting PLUS the distance from the camera to the subject. You will soon discover that aperture setting is not the only reason why backgrounds are nice and soft or too much in focus.

The relationship of the distance from:

  • camera-to-subject
  • camera-to-background
  • subject-to-background

 ALL affect how in- or out- of focus the background appears.

 Backgrounds far away when the subject is close to the camera will be very out of focus and backgrounds close to the subject will be much more in focus.

 Said another way, the closer you get to the subject, the more you must stop down the aperture in order to see a given amount of Depth of Field. 

The farther the camera is from the subject in focus, the closer to wide-open you can shoot while still getting deep Depth of Field. As I said before, distance-to-subject has about the same effect on Depth of Field as aperture setting. How we use our lenses creates our perception that they don’t all behave the same way, but the laws of optics and 35 years of experience say that they do!

Ted Dayton, Valencia, CA

NOTE: NEW PHOTOSHOP WORKSHOPS TAUGHT BY DAVID SAFFIR – First session is Turbo Portrait Retouching, July 19, Santa Clarita, California. For more info, go here.

Managing Limited Edition Printmaking

A new post on the HP Pro Photo Blog has some great info on managing limited edition prints. It includes info on edition size, media selection, pricing, and more. You can find it here:

http://tinyurl.com/ngn2yl

New Media Tests Published by Wilhelm Research (Great Output Blog)

New info on print permanence using Canson inkjet media is posted on the Great Output Blog, written by Eileen Fritsch. It includes detailed info regarding print life using Canon, Epson, and HP ink sets with Canson media. You might also want to check out Eileen’s library of printing related articles – always interesting and relevant.

 The article can be found here: Great Output.


Great Output

Introduction to Fine Art Reproduction for Artists

Introduction to Fine Art Reproduction for Artists, sponsored by April Beielefeldt and David Saffir

 July 18, 2009 4pm – 6 pm

 Join us for a late afternoon update on the art and science of creating new editions of your art work!

 We’ll have light wine and cheese refreshments, and a brand new studio to work in. We will review:

  •  Reasons for creating fine art reproductions of your work: artistic, business, career, and others
  • What to expect in the appearance and color fidelity of a new print
  • Process involved in digital capture, image editing, and printing
  • Managing your edition: number of proofs, number of prints, cost and pricing, choosing a paper type, and more
  • Marketing your work effectively!

 Event registration link is here. Registration is limited!

New Workshops – Turbo Portrait Retouch, Landscapes / Scenics, Book Publishing

Updated: Photoshop, Adobe Camera RAW, Bridge, Lightroom.  
Image Editing, Printing, and Publishing for Photographers

This is a multi-session series that enables photographers and other artists to use Adobe image editing products effectively and efficiently. I use a goal-oriented, hands-on approach. Sessions are divided into segments which focus on important issues. You’ll go home and get results! 

Course materials include a CD with example lessons, and image files. 

CLASS SIZE LIMITED TO 20. EARLY SIGNUP IS ENCOURAGED.

•Session One, Photoshop – Turbo Portrait Retouching, July 19 COMPLETED

•Session Two,  Landscape and Scenic Imagery, July 26

•Session Three, Design and Create A Photo Book, August 16


Event Location: SCV Center for Photography

28368 Constellation Road, Suite 340, Santa Clarita 91355


WORKSHOP TWO: EDITING LANDSCAPE AND SCENIC IMAGERY IN PHOTOSHOP

July 26, ‘09, 9 am-5 pm. Session fee $79 before applicable discount. Location: SCV Center for Photography, Santa Clarita, Calif.

Laptops encouraged. Students are also encouraged to bring their own images to work on.

Topics Include:

-Tips and Tricks in Camera RAW – get that image ready for prime time!

-Matching color in multiple images

-Full- Frame Color – fast track to whole-image color control

-Selective Color – adjusting selected colors to make an image “pop”

-Lighting – adjusting luminance of the entire image, orselected areas

-Creating that cool 3D look- dimensionality and depth with two key Photoshop tools

-Recovering highlight detail, restoring shadow detail – two techniques for success

-Poor man’s HDR – combining exposures for extra bounce

-Create front to back depth of field and sharpness – landscapes and close-up shots

-Intelligent Sharpening – crisp details, no halos!

-Converting to Black and White – using color adjustments and filters

-Choosing print media for appearance, longevity, marketability

-Providing a Professional Certificate of Authenticity with each print sold


 PRICING AND REGISTRATION INFO HERE


 ——————————————

WORKSHOP THREE: DESIGN AND CREATE A PHOTO BOOK

Aug 16, ‘09, 9 am-5 pm. Session fee $79 before applicable discount.

Location SCV Center for Photography, Santa Clarita, Calif.

Laptops encouraged. Students are also encouraged to bring their own images to work on.


Topics include:

-Matching your work to a book design – large or small? wide or tall? and more!

-Creating a theme – subject, color palette, storytelling

-Choosing images

-Matching images that share a page or spread

-Creating the cover, and each page, including layout options

-Imag editing for your book – step by step

-Preparing your book for printing

-Managing costs through good design

-Selecting a book printing service

-Distributing your book – as a product, and as your portfolio


 PRICING AND REGISTRATION INFO HERE


All content © David Saffir, Santa Clarita, CA all rights reserved.


Managing and Archiving Your Photos

Managing and Archiving Your Photos: Part One: Organization 
by guest author Robert Ash

About the author: “Known data warehousing expert Robert Ash heads a global product management team at a leading  software company. He has 15 years’ experience working with the world’s largest data warehousing environments. His customers have won the past two awards for running the world’s largest mainstream commercial databases, plus other industry awards for data warehouse architecture and administration.”

Also an accomplished photographer,  his work has also earned high critical acclaim from top industry experts. His work hangs in company lobbies and in private collections. His online portfolio can be viewed at www.pbase.com/robertash 

Introduction

 This is first in a series of articles that will review options in managing and archiving your photos. Closely related to the overall topic of Digital Asset Management, “Managing and Archiving Your Photos” will show you options available, how to choose what is best for you, how to build a management structure with reasonable effort, and ensure that your system can be used pretty much regardless of which software you choose.

Overview  

We have all felt, from time to time, that managing our digital photos can be difficult, time-consuming and confusing. Organizing photos on disk is the first and most important step in digital asset management. I designed the method shown here to:

  • Make photos easy to find, even years later
  • Require minimum effort to maintain
  • Provide flexibility to easily use any program you choose, or to use multiple programs (Bridge, Lightroom, etc.)
  • Keep time spent embedding and updating keywording to a minimum
  • Reduce computer time needed to search for an item or items

Summary

Organize images on disk the way you’ll most likely, or most frequently, want to retrieve them. Make your program reflect your on-disk structure then add the minimum additional structure needed

Details

At a fundamental level, there are two ways to organize images – time-based and subject-based.

Most writers prefer time-based organization, typically by year – create a folder for each year then sub-folders beneath it. That works if your workflow is time-based and you typically don’t need to retrieve images after you’re finished with them.

Organizing by year frequently requires duplicating your subject structure for each time period (e.g. 2008 Gorillas, 2009 Gorillas, etc.), which can be a big time waster.

 Here is my approach for working by subject:

  • On your main volume or drive, create one folder Photos to hold all images. That allows full backup with drag and drop of one folder. (more on backup and storage in articles to be published in the near future).
  • Under Photos create a small set of major category folders. Suggestions include Locations, Nature, People, Events, Other Subjects, Personal Projects, 0-Personal&Family. (I use 0-Personal&Family instead of just Personal&Family so that category will sort to the top of the list. )

 Here is how my largest sized category, Locations, is organized:

You might have a main folder United States, a sub-folder of California, then perhaps Los Angeles as a subfolder of California if you do much photography there and want more fine-grained division for that specific folder.

Folder Tree

 You can also add subfolders at any time and any level you want. Just add one new folder and move relevant subfolders into it. Note that year is the bottom category, not the top one, because for me it’s the least important for look-ups and it’s placed where it makes sense for me.

 My other folders are organized like this:

  • add any categories or subcategories you want or need
  • Animals>Bears>Canada>BritishColumbia
  • Canada>Wildlife>Bears>Grizzly>Angry Grizzlies

Strengths/Limitations

 This method drastically reduces the number of keywords needed for image look-ups because the major keywords are already the folder names. All Alaska or Lion or Sunset or Still Life or Weddings images are in a folder that is labeled with the appropriate name.

 Programs like Lightroom allow you to go to your Alaska folder or Juneau folder and see all your Alaska (Fairbanks, Juneau, Sitka),or Juneau (2003, 2006, etc.) or Lion (Tanzania,  San Diego Zoo, etc.) images at once.

 Even better, you can use any program you wish to access the images easily without having to duplicate your major keywords in all the programs, as they’re included in the folder names. (I like this idea a lot – David)

 So if your main program’s catalog gets corrupted or accidentally deleted you can still find images easily.

 Finally, you only need to create each major category once (e.g. Alaska) instead of looking for Alaska in 2007, Alaska in 2009, etc. plus having to remember you didn’t go there in 2008.

 This method will not solve issues like finding all the images including Trees in Munich in Parks in 2007. No on-disk organization method can do that. That level of detail requires keywording, and the most specific the lookups the more keywords required. That requirement either marries you to one program or requires duplicating keywords.

 However, this method can still be of great help if you need to use a different program and can’t duplicate all the keywords. In that case it’s like requiring looking only through the M’s or S’s or Aa-Ae in a telephone book instead of searching the whole book for that year.

If you need to categorize by year as well then programs like Adobe Lightroom allows automation of that through “Smart Collections”, which we can explore more in the next article, Capture and Import.

Robert Ash