Part Two, Fine Art Paper From Parrot Digigraphic

I’ve had the opportunity lately to work with a number of inkjet printing papers offered by Parrot Digigraphic. There’s quite a range of media to choose from, so for this post I decided to focus on a fine art paper that I particularly like, and that seems to fill an relatively unoccupied niche – Angelica Natural White Textured, 315gsm.

I say it is in a niche not because its application is narrow, but because it combines a very nice hand with subdued but effective texture. Its natural white color is very pleasing, lending a slight warm tone to unlinked areas of the print. As a point of comparison, I feel it falls in between Hahnemuhle Photo Rag, and Hahnemuhle textured fine art style paper – and quality is more than comparable.

The Old House © David Saffir

This is a finely-made watercolor-style inkjet paper intended for use with pigment and dye-based inks. I have found that when using pigment inks its rendered color gamut is very good, and black and white images show smooth gradations, strong blacks, and detailed highlights. Dimensionality and “presence” are excellent. It is available in both roll and sheet packaging.

I profiled this paper on my HP Designjet Z3200 using the built-in spectrophotomer and HP color management software. I’ve found the paper interacts well with the color management tools and the printers – and these paper profiles are stable and accurate.

As with many other papers, there may be room for improvement in this in-printer profile, through using the HP Advanced Profiling System, which generates test targets with a greater number of test patches. However, prints made using current profile are quite good, and I don’t see any issues across the color gamut, or in highlight/shadow detail.

Parrot also offers excellent in-house paper profiles for use with a number of inkjet printing systems.

The paper takes ink quite well, with no sign of cockling or other distortions. It handles well off the roll, which is always a bit of a challenge for fine art/watercolor style papers.

As with all non-photo-style papers, I recommend that users turn off the auto-cutter, as this may generate dust inside the printer. Instead, it is best to cut the paper outside the machine.

Overall, I like this paper for photographic use. I have not yet tried it for fine art reproduction. Parrot’s price point is very competitive – the combination of price and the paper’s performance makes this an option well worth consideration for your media lineup.

Parrot Digigraphic

IF YOU LIKE THIS POST please share it via one of your favorite media services – link buttons below!

Coming Up – Posts on Screen to Print Match, and Black and White Image Editing

I’ve been thinking about our latest webinar focused on end-to-end workflow. It was an amazing experience for me to have so many people on-line for the session.

Although there were many, many questions asked during and after the webinar, it seems to me that at least two topics deserve further discussion:

– Screen to print match – particularly display calibration
– Creating and Editing Black and White Images with Silver Efex Pro

So, in the next week I’ll be writing and posting articles related to these two subjects. In the first article, an important point of discussion will be the relationship between screen brightness and gamma, and how we match display to print.

In the second, I’ll focus on selective adjustments in Siver Efex using control points – control points can be used in a number of ways to manage small, and larger areas of an image – that statement doesn’t really do it justice, as you’ll see in the article.

Again, my thanks to sponsors Nik Software, Mac Group, and X-Rite Photo.

Happy Thanksgiving!!

Parrot Digigraphic Inkjet Paper Testing, Part One

From time to time, I get samples of paper to try in my studio. John and Mark Lorusso of Parrot Digigraphics were kind enough to send me samples of a number of media types, all branded as in-house Parrot products. I’m going to report on my experiences with these papers.

I’ll write this up in two blog posts, one tonight, and another within 48 hours (things are really busy right now – we have print competition tonight, among other things.)

Moving along: in some cases, one finds that these papers cost less, but don’t deliver the quality. In the case of Parrot, that’s just dead wrong: the Parrot papers are very high quality, render images well in color and black and white, have a nice “hand”, and last but not least, in many instances cost less than the average for high quality goods in this category.

I’ve been working with these papers over the last week or so:

Parrot Ultra Lustre Photo, 10 mil
Ultrawhite Matte Canvas, 21 mil
Angelica Bright White Smooth, 315 gsm
Angelica Natural White Textured, 315 gsm

I may have left one name out, but I’ll get it straight soon enough.

I’ve been printing these papers using the HP Designjet Z3200. I like the Z because it has a built-in spectrophotometer, and with just a few mouse clicks, I can profile a paper, print an image, and voila! Great color!

So far, my favorites are the Angelica Bright White Smooth, and Natural White Textured. They seem to fill a gap in products offered by other companies. In particular, the Natural White Textured seems to step in between other papers – for example, Hahnemuhle Photo Rag – the paper has a pleasing base color and texture, but not so much texture that it overwhelms the image, or starts to look like a canvas print.

That’s all for today, more to follow. Stay tuned!

In the meantime, here’s a link to the Parrot Digigraphic web site.

New Solutions From ARTtrust: Preventing Fraudulent and Unauthorized Use of Fine Art Photography and Artwork

Modern scanning, editing, and printing technology has made it easier than ever to copy an image or piece of art and reproduce it – speaking from personal experience, it can be quite difficult to know which is the original, and which is the copy!

And, of course, we’ve all heard reports and stories about unauthorized use, copying, and outright fraud involving a photographer’s or artist’s work.

The immediate impact is straightforward: money-out-of-your-pocket theft.

But what about the loss of credibility for the artist/photographer – and the reduction in value of a limited edition? Uncertainty about the provenance or number of pieces in the market quickly erodes the value of work already sold – and of course, work that is still on the market.

A company called ARTtrust has created a new, unique solution for these problems – one that helps users to identify and verify authorized work, discourages theft, prevents unauthorized copying, stops “limited” edition over-runs, and more.  ARTtrust makes it possible to provide a unique identity to each print in an edition or to each unique work, whether lithography, serigraphy, design, sculpture, etc.

ARTtrust is an identification and verification system that can be used by individuals, galleries, curators, collectors, museums, and others – the ARTtrust system is easy to understand and implement, and is as nearly perfect a security solution for art and phtography as exists today. ARTtrust provides for control by the artist, owner, authorized organization, or delegated curator or printmaker. Founder and CEO Philippe Serenon likes to say that “ARTtrust is simple, precise, secure, accessible, and authentic”. ARTtrust’s international partners include HP, Innova, Canson, Hahnemuhle, and others.

The ARTtrust system includes:

– A set of three unique identification tags, provided in a set, that cannot be duplicated. One tag is affixed to the artwork or print, another to the Certificate of Authenticity, and the third to the owner’s or printmaker’s file copy or BAT. (more on this later). The tags cannot be removed intact – any tampering destroys the tag. Each set of tags in unique to the individual piece of art.
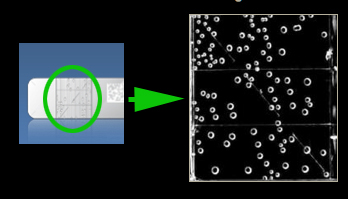
ARTtrust Bubble Tags

– Each item that is tagged is registered via the ARTtrust online system. A digital image is uploaded, and the unique identification tags are linked to this image. The record can be accessed online by authorized users or a potential customer, providing quick and accurate validation of the item.

– The owner, authorized user, or delegate of the artist can print a pre-formatted Certificate of Authenticity (COA) to accompany the work. The tag on the art work or photograph can be matched to the tag on the COA via the ARTtrust database. Another certificate can be printed for use as a file or reference copy – this carries the third tag.

The technology at the core of the ARTtrust system is the Bubble Tag. This is a 3-D polymer tag which has a one-of-a-kind pattern of bubbles embedded in it. Each Bubble Tag is as unique as a fingerprint, virtually impossible to duplicate. (ARTtrust freely admits that they can’t do it – and they believe no one else can, either.)

The Bubble Tag Compared to Online Record

ARTtrust also provides an on-line gallery for its customers – whether they are individuals or organizations. The gallery includes a digital image, the serial number of the ARTtrust tag assigned to the work, and an image that can be compared to the ARTtrust tag.

An ARTtrust Image Gallery

If you click on one of the images, you’ll see this:

Image with identifying Bubble Tag

Anyone who is interested in buying or exhibiting a print can visit the ARTtrust website, find the online record*, view the bubble tag for verification (compare the tag image on screen to the tag on the artwork – and match the ID numbers), and review additional details about the print, such as availability and pricing.  (*One can enter the serial number on a tag, and easily retrieve the record of the work connected with that tag.)

Interestingly, there is also an iPhone application which can read an ARTtrust tag and provide verification on the spot! You can download the iPhone app on the iTunes App Store – just search for i-ARTtrust.

Here’s a link to the ARTtrust web site – the front page is shown below.

ARTtrust Web Site

Now photographers and artists, individuals and organizations have an independent, secure resource that helps them control and market their work, preserve value, prevent fraud and theft – and it is accessible online almost anywhere in the world.

____________________

Disclosure: I have in the past acted as a consultant and beta tester to ARTtrust and some of its business partners. I received no compensation for writing this blog post.

In New York? Come to Pro Photo Expo!

I will be at PPE (Pro Photo Expo) at the Javitz Center Thursday through Saturday this week. Come by the HP exhibit and say Hi! I’ll be working with the new Digital Negative Printing process, the ArtTrust security ID system for fine art and fine art photos, and the Designjet Z3200 large format printer.

We’ll have some amazing prints from Elliot Erwitt’s collection for you to see.

I’ve included a link below for the Platinum Printing video, and I’ll post the ArtTrust web address as soon as the latest revision is completed. :))

Here’s a video about the Platinum Printing Process:

http://www.youtube.com/watch?v=S8HroH1Leio

and here’s a web page about the process.

See you at the Javits Center!

New Testing, Inkjet Media From Parrot Digigraphic Scheduled July 2010

Those of us who make our own prints are, in many cases, constantly looking for that ideal combination of quality, price, and appearance in our inkjet papers. We’re lucky, in that our options increase daily, and competition keeps prices in check – if not driving them down at times!

My good friends and colleagues John and Mark Lorusso, and Ted Dillard of Parrot Digigraphic (Parrotcolor.com) offer an interesting line of private-label inkjet papers. They’ve printed a number of my images for me on these papers – in color and Black and White – and the results have been impressive – so much so that I want to try them in my own shop.

The line includes (not in any particular order): Angelica Bright White Smooth, Angelica Universal Photomatte, Angelica Bright White Matte Canvas, Angelica Universal Photo Matte, and Parrot Ultra Lustre. It’s quite a lineup.

I’ll be getting a box of samples to try, and I intend to start printing next week.

I’m planning to produce a range of color and Black and White prints. Parrot offers a set of ICC paper profiles (http://www.parrotcolor.com/store/pages.php?pageid=8), and there is also a video provided with instructions on installing the profiles correctly. I’ll be trying a few of their profiles, and I’ll also make my own profiles in-house using the built-in spectro on the HP Z3200.

So, some new printing experiences coming, and I’ll follow up here with a brief report the week after next. My thanks to John, Ted, and Mark!

More here: http://parrotcolor.com/

Photography Quote of the Day – April 22

The Wave

“ You’ve got to push yourself harder. You’ve got to start looking for pictures nobody else could take. You’ve got to take the tools you have and probe deeper. – William Albert Allard

“I hope the Pacific is as blue as it has been in my dreams” – Shawshank Redemption

Review, Nik Silver Efex Pro Software and Creating Black and White Images

I recently got the latest version of Silver Efex Pro, created by Nik Software. I’ve been using it as a plug-in in Photoshop. I’ve found it to be a feature-rich, effective tool in creating pleasing, customized black and white images from color digital originals.

In this post I’ll cover some highlights regarding the software – for more details, see the Nik website, which has training videos and more.

One aspect of the software’s flexibility is that one can use a wide range of presets – or completely customize the conversion. For example, Nik includes presets for 18 black and white film types, which adjust the image in line with the tonal qualities, contrast, grain, etc of each option.

One can also start with a preset, customize it, and save it as a personal set of adjustments. I have found this to be particularly useful when converting several images from the same series.

Here is an image I’ve been working on recently, in a screen shot from Photoshop. The photograph was taken in Vancouver, Oregon using a Hasselblad H-series camera and a Phase One back – captured in color, of course. I’m using one of my edited files, and I’ve turned off all the adjustment and conversion layers to show you the original.

The Old Barn

I thought of converting it to black and white for several reasons – gray skies, pretty much one color for the structure, and to emphasize the age and condition of the barn.

The Silver Efex plug in lives in the Photoshop Filters menu. The first screen looks like this (I’ve turned preview off so you can see the image in color):

The dialogue box is divided into three main panels: on the left, you’ll see the conversion presets. These can be used to make a conversion in one step, ranging from neutral/conservative, to intense. Conversions for ambrotype and cyanotype are also included.

Overview

In the middle is the preview pane. On the right hand side is a series of control panels that nest in a column to save space. A left click on a bar opens that set of controls for viewing. Controls for brightness, contrast, and structure are placed at the top of the column. (structure refers to the appearance of fine detail).

Top Control Panel

These adjustment controls can be used globally in the image – or, one can use a Control Point (illustrated below) for localized adjustments. A control point can be placed anywhere in the image by clicking the Add Control Point button and left clicking in the image. It provides sliders for controlling size, brightness, contrast, and structure – note the circle around the control point.

Control Point

Multiple control points may be used. Individual control points can be turned on and off.

One of the more interesting features of Silver Efex pro is located in the Color Filter panel. There are five color filters, and these may be used as one would use an analog filter on-camera. There are sliders provided to adjust the hue and strength of the filter.

Silver Efex Pro Filters

Another feature I find very useful is the Film Types control panel. This includes 18 pre-sets for well-known black and white film types. Left clicking on the drop-down reveals the film types, and hovering the mouse pointer over an individual item activates a preview of the effect.

Film Type Presets

Interestingly, an adjustable tone curve panel is provided, so customization is possible. This is similar to the Curves adjustment tool in Photoshop. “Film grain” can also be added and adjusted here.

Film Curve

The stylizing bar contains controls for vignette, toning, and burning edges. Each has fine-tuning controls that allow wide latitude in adjustment.

The Loupe panel provides a magnified view of the image – hover the mouse pointer over the area you want to see. The grey step wedge you see underneath the Loupe viewing area will help in identifying areas of the image that are in each tonal zone (1-10). Left clicking on one will cause that tonal area to be highlighted in the preview.

Loupe Panel

When you’re done with your adjustments you have the choice of having the conversion applied to the current layer, or having Silver Efex Pro create a new layer for you.

One pleasant surprise is that Silver Efex Pro can be used with Photoshop Smart Filters. This means that one can make the conversion, and if needed, go back and readjust.

Once the conversion was complete, the dialogue closed and I was returned to Photoshop. I added a curves adjustment layer for midtone contrast, and I was finished.

I want to point out that Nik also provides an option in the Silver Efex dialogue for one to brush the effect on selectively, rather than apply it globally to the image. This is, of course, useful in creating special effects, selective color/black and white images, etc.

I like the final result. This has the appearance of a continuous-tone image, with good tonal range, smooth transitions, crisp lines of contrast, good detail, and it is completely neutral.

Old Barn

NEW WORKSHOP ON NIK SILVER EFEX PRO COMING UP, JANUARY 2011 CLICK FOR DETAILS!

Silver Efex Pro can also be used with Adobe Lightroom and Apple’s Aperture. SPECIAL NOTE: Special Nik software coupon code “dsaffir” just for my blog readers.
Go to niksoftware.com.


Photography Quote of the Day – April 15

Still Waters

A great photograph is one that fully expresses what one feels, in the deepest sense, about what is being photographed.” – Ansel Adams

Black and White Prints from Color Images by David Saffir

By David Saffir via the Pro Photo Blog:

Many of us love black-and-white prints for their simplicity and how they can increase focus on a subject or feeling. Here are a few tips to consider when making black-and-white prints from color digital images. Capture your image in color (full text via this link).

Convert Color to Black and White