Review, Adorama Flashpoint 180 – Portable Flash Unit

I have a new portable flash unit in-house for testing. It is the Flashpoint 180 – a highly portable, lightweight unit that produces up to 180 watt/seconds of output. It comes complete with portable battery pack and charger, a diffuser dome, a reflector, a shoot-through white umbrella, a brief instruction manual, and a carrying case.

180 1

According to the manufacturer’s specs, it is capable of up to 700 flashes at full power. Flash duration ranges from 1/400 to 1/1100 of a second, depending on power output selected. Specifications state that color temperature is 5500k +/- 200k, which is reasonable.

The battery pack consists of two Sony rechargeable units housed in a plastic case; these are removed and charged via external charger. The manufacturer provides two charging units. Good news is that 700 shots should get you through a full day’s shooting. If you are shooting consistently outdoors in bright light or direct sun, depending on your needs you may want to get two of these, one of the 180 model, and another of the 400 model, using one for key lighting and the other for fill or add-on.

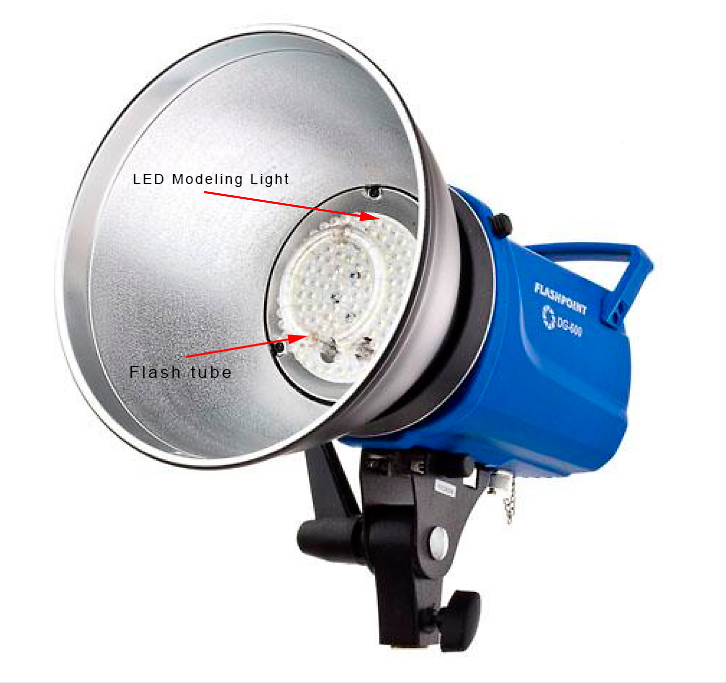
Overall, this is a lightweight unit, favoring portability over bullet-proof construction. The controls are sturdy and well made, and should hold up over time. Most of the flash body is aluminum, and a diffuser dome does double duty protecting the flash tube and LED-based modeling light. This is definitely not water-proof, so I would take care outdoors in mist or rain.

180 2

Power output is controlled via a stepless rotating knob, providing about 5-stops range. A slave sensor is also provided, along with an on/off switch for a triggering audio signal.

An LED modeling light is provided, but it’s anemic at best. Not too surprising, as many people will leave it turned on throughout a shoot, and that will drain batteries quickly.

Adorama also provides a short padded handle which can be inserted into the mounting socket – it’s easy to carry the unit around in the field – you would just clip the battery pack to your belt or carry it in your off hand.

Like any other studio flash unit, time to recycle depends on power output selected. This ranges from 1-5 seconds; not surprising at all on a battery-powered unit supplied by a lower-voltage power pack.

I also like that the unit is Bowens-compatible. As I own some Bowens gear, that’s a big plus in my book. I can use their light modifiers on this flash unit, for example.

Overall, a good, lightweight unit, highly portable and suited for use in the studio or just about anywhere you want to go.

Link to the Adorama page: http://www.adorama.com/FPBPLB.html

New Webinar – Small Lighting For Big Spaces

New Webinar – sponsored by Datacolor and co-sponsored by Metz

Not too long ago, standard practice for lighting large spaces involved hauling a lot of heavy equipment into a venue, laying out electrical service lines, creating support stands and scaffolding, and so on. Of course there was also tearing it all down, packing it away, and hauling it off again. Things have changed. It’s now possible to carry all or most of the gear you’ll need to light a large space in a duffle bag and camera bag, frequently doing it all without touching an electrical outlet and getting an equivalent or superior result.

Join David Saffir and David Tobie as they explore newer methods for lighting interiors using lighting systems adapted from on-camera flash units, purpose-built remote units and triggers. We think you’ll be surprised by the possibilities and impressed by the results!

An interactive Q&A will take place throughout the webinar to answer any questions you may have.

Webinar attendees will have the chance to win a SpyderCHECKR or Metz 44 Flash as well as receive exclusive discounts!

October 17, 2 PM EDT, 11 AM PDT

Register HERE!

Product Review: The Flashpoint DG600 300 w/s AC/DC Monolight

I’ve been testing a studio strobe from Adorama, the  Flashpoint DG-600. Intended for use in both studio and location work, this is a 300/WS workhorse (published guide number of 58m/190ft ISO 100) that offers flexibility in many types of shooting situations. It can run on normal household power (US) or a 12v DC power pack.

The housing of the light is made of heavyweight plastic, and seems quite durable. An attached carrying handle is provided, as is a  8” metal reflector – the latter is attached using a locking bayonet-style design.

On the front end, one sees a conventional semi-circular flash tube mounted in front of an LED-array modeling light.

hero shot angle

At the back, most controls are push-button variety, with the exception of the power switch, which provides on/AC, off, and on/DC positions.

hero shot rear

The unit is provided with a nice long power cord (which is a good change – it seems lately that power cords are shrinking in length, or are not provided at all), and a PC/sync cord for those of use who haven’t yet gone to wireless triggers. The sync plug on the housing is of mini-plug variety, not the full-size “stereo” plugs one often sees.

Push button controls include flash test, sound on/off, modeling light, and slave operation. Flash intensity is read through a digital numeric display, and is controlled through a rotating knob. Flash intensity numbers are not linked to f/stop, but are displayed relative to total flash output, from nil to maximum.

Flash output is consistent in intensity right from start up, and stays that way throughout a shoot. Max recycling time is 1.5 seconds at max power (AC) – but at lower power settings is near-instantaneous. The cooling fan is quiet and unobtrusive. Stated flash duration is 1/800 to 1/1500/sec.

I also tested the light with a color meter. While I found that the light easily hit daylight color temperature (5500k) a from a cold start, it needed to fire a few times before settling in and stabilizing at this color temperature. (In other words, color temp varied a bit from shot to shot from a cold start to warm-up).

Once warmed up, variance in color temperature in the mid- to ¾-power range was not a significant issue. At full power, it took a bit longer for the light to warm up and stabilize – if you are shooting at full power, and the light has been resting a while, fire off five or six test shots to bring everything into line.

The modeling light is an LED array, which operates in proportion to flash output settings. This is a great idea – those of us who engage in day-long shoots will appreciate this. Completely cool, with no appreciable heat generated, so less wear and tear on umbrellas and soft boxes, not to mention one’s fingers!

Also, unlike tungsten or halogen-based bulbs, it is roughly the same color temperature as the flash tube, which is a significant convenience. However, the modeling light is challenged to provide enough illumination used with a diffuser or soft box, and I’d like to see available luminance increased. Otherwise, a brilliant idea (no pun.)

One might think that the lower power usage of the LED modeling light would bode well for its use with a battery pack – however, Adorama doesn’t recommend this.

Accessories available include a NIMH portable battery pack and spare battery, a speed ring for soft box/light modifiers, a beauty dish, umbrellas, and related items.

At this price point, $199, this light is a good value vis-à-vis overall build quality and light output, and it appears that it would deliver sold performance in the field or in the studio. In my opinion, at 300/ws, a couple of these would fill an average room nicely – even at levels below full power. All you location shooters and real estate photographers, take note!

The Flashpoint DG-600 is available through Adorama: http://www.adorama.com/FP600DG.html

To be placed on the notification list for new posts, workshops, or webinars sign up for
my blog subscription here.

Studio Lighting Workshop: Portraits with Style!

Studio Lighting Workshop: Portraits with Style!

David Saffir instructor $89, Saturday, March 19th – 9am to 1pm

Learn how to successfully pre-plan your photo shoot, put your lighting setup together to match a particular “look”, capture your image successfully, plan your editing in Photoshop, and create an image you can successfully print or provide as a digital file.

Model Sara Muldorfer

This is a “hands-on” workshop. We’ll take you step by step through the process:

• Pre-session planning meetings with customers, clients/models, and others

• Identifying a look or theme, including use of printed examples, design ideas, and the like

• Pre-shoot coaching, with focus on making diplomatic suggestions for wardrobe and makeup

• Studio preparation, including backdrops, choosing a lighting style, and two or three light setups for portraits

• Classic vs. non-traditional lighting, using main and accessory lights

• Setting up your camera for successful capture, including tethering to a computer

• Three-step fast and efficient editing in Photoshop

• Providing proofs to customers/clients

• Preparing for printing or publication

Although we use studio flash in class, we start with continuous lighting (hot lights), which helps students see how lighting changes work, moment by moment.

This one-day focused workshop teaches an uncomplicated, efficient, professional process from start to finish. You’ll leave the session with a list of skills you can practice that will help you improve the quality of your work and your client’s satisfaction!

This is a hands-on workshop, so please bring your camera. We will provide a light meter for your use.

Contact Mel Carll at 661 904 2092 for reservations.

Creating Deep Black Backgrounds for Your Images

Written by guest author, Ron Brewer

A dark background can draw the viewer’s attention into an image, and create a dramatic effect that is unique and compelling. Subtleties of lighting in the foreground or mid-ground, for example, become more noticeable and have great impact on the “feeling” of the image.

The easiest, quickest way to create a black background for your image is to make it happen in-camera and not in post-production work (such as in Photoshop).

A Dark Background Adds Dramatic Impact © R Brewer

Setup

Shoot in a dimly lit room. Use a light source that falls only on the subject. The speedlight (flash) you use in your camera’s hotshoe will work fine for this, but you will want to take it off-camera to create this effect. A remote trigger is best.

And if you don’t have a speedlight, don’t fear. You can even use a flashlight (more on this is a later post).

The first method you could use involves use of a black piece of material in the background of the shot. Place the background at least 4-6 feet behind the subject. Keep the light that is on your subject from illuminating the background, so it stays dark in the image.

I prefer a different method. It is called “working above the ambient” by David Hobby of Strobist fame (www.strobist.com). This method is rather easy to create indoors. It can be done outdoors, but in this case, we are going to focus on an indoor shot.

We want to eliminate the influence of ambient light in the picture. The only light you will be working with will be from the flash. Your camera’s exposure will be set so as not to pick up any ambient light, and then you will bring the power of the flash to the right setting to get a proper exposure on the subject. Sounds challenging? Experiment and it will quickly become second nature.

Image Creation

  1. Use a room or space that has low light
  2. Set your ISO to 100 or 200; at least the lowest “native” setting offered in your camera
  3. Set camera to manual exposure
  4. Set shutter speed to highest available flash sync, usually 1/125, 1/200, or 1/250
  5. Take a test shot without flash. Set aperture small; anywhere from f/11 to f/22. You want the result to be a completely black frame.
  6. Evaluate the histogram. Increase aperture size (from f/22 to f/18 for example) by steps until you start to see ambient light in the frame, and back off to the previous setting.

    © R Brewer

    Next, you’ll start working on lighting the subject. We’ll discuss using flash first:

    1. With your flash off-camera, set it to a power that is sufficient to properly expose your subject. You might start with the flash about two feet from the subject and to its side (for example, let’s say the subject is something small, like a single flower bloom). Try setting the power to 1/128 or whatever the lowest power setting is on your flash. Take the shot and check the LCD and histogram. If the shot is over exposed, then lower the power of the flash or move it farther away from the subject
    2. If under exposed, then up the power of the flash or move the flash either closer away until the proper exposure is achieved.
    3. Do not adjust the camera exposure settings or you will start recording the ambient light again. Camera exposure settings are set to remove the ambient light from the picture, not to set the exposure of the subject.
    4. Put another way: set the exposure for the subject by adjusting the power setting on the flash or by changing the distance between the flash and subject. In essence, you are going to adjust the amount of light on the subject until it properly exposes the subject at the exposure settings you have already set into your camera.

      Setting Up For A Dark Background

      (red circle is the subject)

      Enhancements

      1. If you find that you are still getting some light on the background, then use something to block the light from hitting the background. Such items are called a “gobo” which will “cut” the light. You can even use a small piece of cardboard. Set the cardboard up close to the flash head, placing it between the flash head and the background. The light will hit the cardboard and be blocked from hitting the background.
      2. Using a black background in your shots will provide a unique look to your photographs. Using a black background makes the foreground colors of the subject really pop. And it guides the viewer’s eye to go straight to the main subject and not drift out of the borders.
      3. With practice, you’ll find that this is a very simple process which you can execute very quickly in most indoor situations. Not only is it a lot of fun, you can end up with some great pictures.

        Written by Ron Brewer, January 2010 www.ronbrewerimages.com

        Subscribe to this blo by E-mail

        Pro Studio Lighting Review: Westcott Spiderlite TD-5

        I have had the Westcott Spiderlite TD-5 lighting system in the studio for testing for the past couple of weeks. I’ve used them for art reproduction, still life/product photography, portraits, macro photography, and more.


        We will have these lights with us during the upcoming Fine Art Printing and Art Reproduction seminar series and Tech Expo, starting later this week in Colorado, moving on from there to New Mexico and Arizona.


        NEWS BULLETIN, JUST IN TODAY AT 1 PM PACIFIC TIME: X-Rite, one of the sponsors of the seminar series will provide an iOne Display 2 as a door prize/raffle gift at EACH seminar event. Seminar attendees are eligible to win this gift. One device will be given away at each event (approx retail value just under $200). 


        I have used three cameras with these lights: my Hasselblad H-series with Phase One back, the Mamiya AFD III with Leaf digital back, and the Nikon D3. All did well.


        IMG_0213


        The lights were provided in a kit, consisting of a transport bag, light stands, light heads, soft boxes, and a few accessories.


        They provide great “window” lighting using the provided daylight corrected florescent bulbs, which are, according to the manufacturer, set to 5500K. I measured them myself with an iOne spectro, and both came in at 5400K. This is an absolutely insignificant difference, in my view.


        The lights can also be adapted to other lighting – for example, strobe heads or tungsten halogen bulbs are easily installed.


        The light heads are easy to adjust; the soft boxes rotate easily from landscape to portrait orientation, and multiple switches on the back of the light head permit use of varying light levels. The soft box mounting ring is built into the light head – very convenient.


        IMG_0194west


        My most color-critical application is art reproduction. Color in artwork is usually so complex that “getting it right in the camera” is extremely important. The even illumination of the lighting system, combined with correct color temperature makes this element of production much easier – and of course minimizes post-production woes.


        We also recently held a “Hot Car and Motorcycle” photo shoot at the SCV Center for Photography. The TD-5 lights did a great job of rendering the color in our “guest” Porsche Carrera S convertible. (see earlier post). Also recently used them for some macro work – see below – same level of performance.


        flower red combo 1 copy final


        Dennis Halley (http://digital2you.cc) and I will have these lights with us on the Focus 09 seminar tour (fine art printing and art reproduction, plus tech expo)  starting later this week. We will be working in Arizona, Colorado, and New Mexico. Join us for these seminars – you just might find a new way to improve business!


        all images © David Saffir 2009

        Nikon Flash and High Synch Speeds

        Found this post on use of Nikon flash equipment and high-sync speeds, looks to be worthwhile:

        http://tinyurl.com/ncbmqm